Board and Batten Siding Calculator
Result:
Material (in Linear Feet)
Boards:
Battens:
Furring Strips:
Installation Summary
Square Feet:
Total Battens:
How to Estimate Materials for Board and Batten Siding
Board and batten siding is the oldest type of milled siding in the U.S. Board and batten siding
has a distinctive look with the boards installed vertically.
Historically, the boards were roughly 12″ wide and 1″ thick, but today, the boards can range
from 6″ to 12″ in width, with 10″ to 12″ being the most common. Thin strips of wood known as
battens, which are usually 1″ x 1″ are installed over the seams.
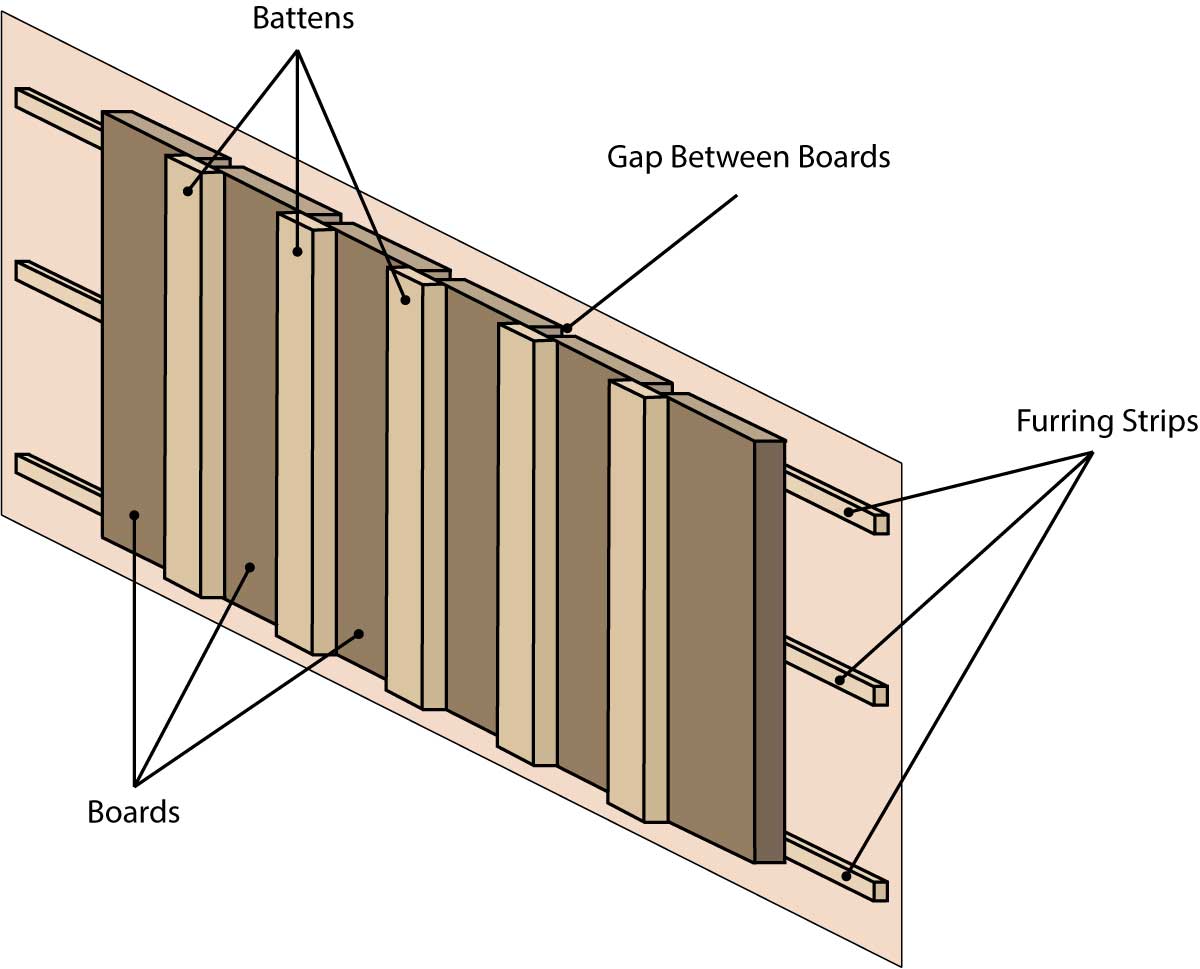
Board and batten siding is found in wood, metal, and fiber cement, as well as in some vinyl
styles. For vinyl and metal, the boards and battens are not separate from one another, and they
are designed to overlap and interconnect. For wood and fiber cement, the pieces are separate and
need to be installed over furring strips.
The first step to estimating materials is to measure each wall’s width and height,

Estimate Furring Strips for Board and Batten Siding
Most homes are covered in plywood or OSB sheathing prior to siding. If this is the case, you can
attach the boards for your new siding directly to the sheathing.
However, some older homes that are not sheathed may require furring strips prior to installing
the finished siding. Likewise, if you are creating a rain screen, or if you are using certain
types of insulation beneath your siding, you may require furring strips as well.
Furring strips are 2″-3″ boards that are installed horizontally every 18″-24″ on the wall. Since
the building’s framing is also installed vertically, the board and batten siding will need to be
attached to these strips.
To find the amount of furring strip material needed, first start by calculating the number of
rows of furring strips that will need to be installed, which can be found by dividing the height
of the building in feet by 2 to find the number of 24″ sections on the building.
Round the number up to the nearest whole number, then add 1 to account for adding a strip along
the top or bottom edge.
If your wall measurements are in inches, then divide by 24 instead of 2.
Estimate the Number of Boards and Battens Needed
The boards used in board and batten siding are often 10″-12″, but can be any width of your
choosing. The boards are wider than the battens, and the battens are installed on top of the
seam between each board.
The battens are thinner than the boards, usually 1″ wide and 1″ thick, though they can be wider
as well.
Most board and batten siding will have the boards butted up against one another, with the batten
over the seam. This comes from the original installations where the home was not watertight, and
there was often no sheathing beneath the siding; the battens helped seal up the walls.
If your material of choice is wood, then the boards should have a 1/2″ gap between them to allow
for expansion and prevent buckling. Larger gaps can also be used as needed, but the battens
should be 1″ wider than the gap to allow for good coverage.
To find the number of boards needed, you simply need to divide the width of the wall by the
width of the board. If you are using a panel installation, such as a steel or vinyl board and
batten siding, you need the total width of the panel, which is often one board and batten
together, but may be as much as two boards and two battens together.
How to Lay Out Board and Batten Siding
There are many ways to lay out your board and batten siding. It is common that your exterior walls may not be evenly divided by the width of the boards. However, most homes do have trim around the edges, which can give you some leeway in how you layout and install the boards.
Getting a wider trim can help fill a space where a board may have needed to be cut to fit. Or, if
you need to cut boards to fit the space, you can lay out the boards so that they begin in the
center of a wall, and move out evenly to either side.
While you may have cut boards on either end, they will be the same width, and will still provide
an even and symmetric installation. If your home is not perfectly square, and has interior
corners, sometimes you may want to “bury” a cut piece in an inside corner, where it is less
likely to be seen.
In some cases, a board may only need to be trimmed slightly. Making a board on the end of the
run 10” when the rest are 12” is unlikely to be very noticeable. A very thin board, however, may
be less desirable, in which case, larger trim may be the better choice.
You can use our board and batten layout calculator to perfectly lay out an even spacing between
the boards and battens.
Note that this step is not required, it is only necessary when it is desirable to avoid an
uneven board width on the final board.