Wainscoting Layout Calculator
- AREA & DEPTH
- VOLUME
Result
Dimensions
Panel Width: 0 ft
Stile Width: 0 ft
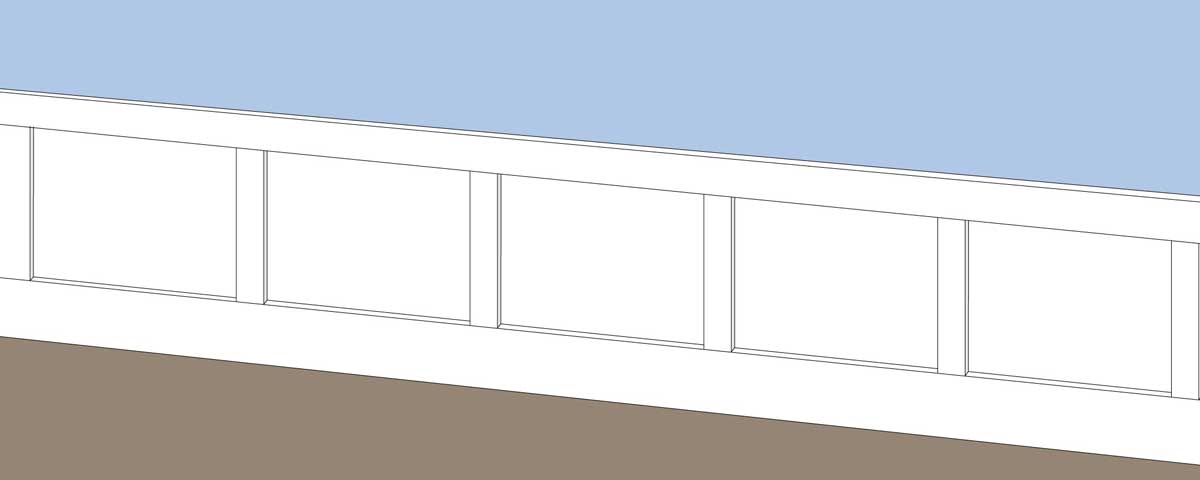
Layout Drawing
Stile Locations
How to Lay Out Wainscoting
Wainscoting is a system of panels, rails, and moldings that add decoration and protection to the walls of your home. Wainscoting may be installed to waist or shoulder height and is available in many materials and styles.

Let’s talk a bit about terminology for the parts that make up wainscoting. The horizontal boards at the top and bottom of the paneling are called rails, and the vertical boards that separate the panels are called stiles.
The larger boards in the middle of the rails and stiles are called panels. Panels may be installed with trim between the rails and stiles, but a flat panel or board and batten look can be achieved without installing a wood panel.
Depending on how ornate you want the installation to be, you can also use additional moldings above the panel molding rails and below the chair rail. These are often called apron moldings, but you can use a variety of styles, including pencil, dental, and screw.
Before starting a wainscoting installation, it is critical to lay out the rails, stiles, and panels. Most often, the panels are an even width, which requires some measuring to find the correct width that allows all of the panels to be consistent.
Step One: Measure Each Wall
To start laying out the panels and stiles, measure the width of each wall in inches. If measurements are in another form, such as feet, convert the measurement to inches.
Step Two: Decide The Number of Panels on Each Wall
Once you have the width of each wall, consider how many panels you would like to install on each of them.
If you are using readymade panels, or installing a click-lock beadboard, get the measurements of each panel or piece. Most panels come in sections that are either 48″ or up to 96″ in width. If you are making your own wainscot out of various pieces, you can determine the size of each panel.
To get an idea, lay out the various components on the floor in front of the wall. You can play with the width of the stiles on the panels to determine the total number of panels there will be, then measure for the final width. Depending on how you lay it out and the type and style of wainscoting, you may measure the width of the flat section inside the moldings, or you may measure the entire section from stile to stile.
You can find out how many panels you need by dividing the width of each wall by the rough panel size. You’ll probably end up with an odd number, like 3.4 panels, and that’s ok; just round to the closest whole number.
Step Three: Determine the Rail and Stile Width
If you are making your own wainscoting and you are using a flat panel style, you will need to determine the width of the rails and stiles that will surround each indented panel. These are flat pieces of lumber, but you may choose to add additional moldings inside of panels as well.
However, the rail and stile widths will influence the size of the flat panel inside of them. The larger the rail and stile, the smaller the panel.
The top rail and stiles are usually 2″-3″. The lower rail is often much wider than the top rail, usually around 7″-8″.
Step Four: Calculate the Panel Width
The next step is to find the exact width of the panels for each wall. It’s likely that the panel size will vary from wall to wall slightly, but the goal is to get them close to the same size or to a size that looks good visually.
One formula to find the panel width is to divide the wall width plus the stile width by the number of installed panels to find the width of the stile and panel together, then subtract the width of the stile to find the final width of the panel.
Keep in mind that this will be the visible width of the panel, or more specifically, the distance between each stile. For panel designs that incorporate trim between the panel and the stile, the actual panel size may be smaller, and for assembled panels where the panel is installed in a groove behind the stiles, the panel may be larger.
The exact style of wainscoting will inform the actual panel width, but at this point, it’s possible to start laying out the stiles evenly on the wall.
Step Five: Determine Stile Length
To find the length of the stiles, start by determining the desired height of the wainscoting, then subtract the top rail and bottom rail width from the overall height.
Step Six: Lay Out the Panels and Stiles
To start laying out the stiles, locate the first stile, which would be from 0″ to the stile width. Then add the width of the panel to find the next stile location. Continue this process along the wall to locate the placement of each stile.
If you are using panel sections that have three or four raised panel designs in them, you will need to make sure that the panels are even on the wall. Otherwise, unless your wall width is perfectly divisible by the panel width, you will have an uneven panel at the end of the wall. Even if you have a panel with multiple raised sections, the wainscoting layout calculator will help you find the proper location to cut the panels for the cleanest installation.
Step Seven: Create a Panel Layout Drawing
To help you determine the final layout of the panels, it’s a good idea to draw the entire wall section out on paper with the panels and stiles. This will give you an exact blueprint of where each section should be installed and help you plan for the project and build a materials list.